| |
SALUTATIO AT THE HOUSE
OF PANSA
|
|
Technical Notes
Note: this page is very graphics-intensive, since it
visually documents the creation of the virtual House of Pansa.
Viewers with slow connections are asked to be patient as
illustrative images load.
Salutatio at the House of Pansa was modeled and
rendered using Martin Hash's Animation: Master software.
The virtual house is actually a complex series of geometrical
objects, onto which image maps (like "digital wallpaper")
are applied, virtual lights are shone, and which are placed
together in a choreography, which is then rendered by the
software to create a snapshot or movie of the virtual space.

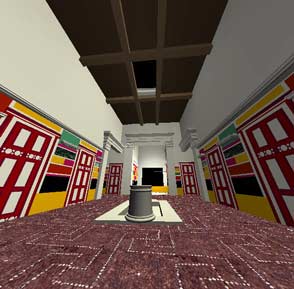
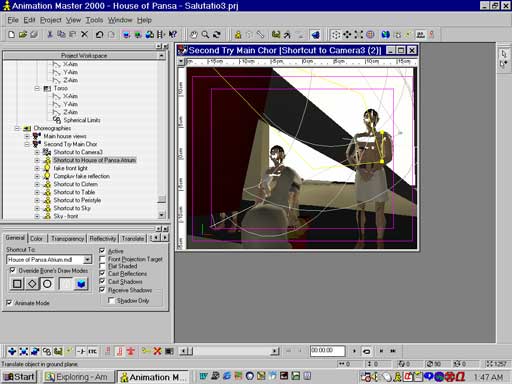
Above is a screen
shot from Animation: Master, the software used
to create Salutatio at the House of Pansa. On
the right is a sample rendering, showing the paterfamilias
in the tablinum. Surrounding it are just some of
the myriad controls that are manipulated behind-the-scenes
to create the beautiful and apparently simple views of
the virtual house.
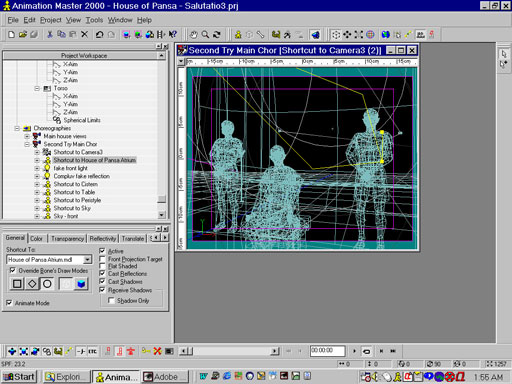
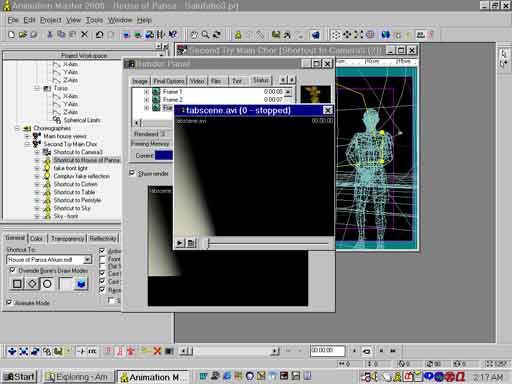
Behind the facade
of beautifully rendered imagery, the virtual House of
Pansa is an incredibly complex simulation of the geometry
and physics involved in this slice of life, which had to
be hand-crafted bit by bit in a very labor-intensive and
time-intensive, yet extremely rewarding, process.This
screen shot shows just some of the virtual infrastructure
that underlies this tablinum scene. Every
surface is actually a network of "control points,"
which are digitally painted and manipulated to mimic
their real-world counterparts.
|
Before any 3D modeling could be done, it was first necessary
to learn the complex Animation: Master software. This
was done by completing a series of test projects and tutorials
supplied with the software and designed to teach the basics of
using the program. This training was done in the first few weeks
of the grant period.
Throughout the virtual model’s development, test shots of
the work in progress were created to record the different stages
of construction, and to assess the various methods used in
recreating the 3D house.
Preliminary Sketches
Once the preliminary research and design of the house was
complete (see Project Overview for
more information on this phase of the project), rough computer
sketches of the house’s walls and floor plan were created in
Photoshop, based on an elevation printed in August Mau's
Pompeii: Its Life and Art and John Dobbins' AutoCAD
floorplan, incorporating actual photographic data from the
archaeological site when possible. This was to give a general
idea of how the house would look, and to help identify problems
of the virtual recreation before production of the actual 3D
model began.
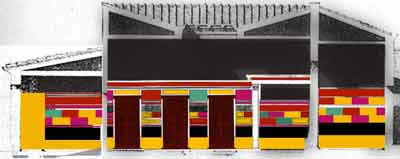
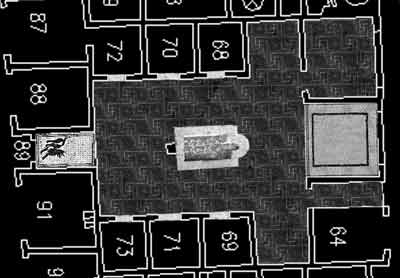
(Above) Rough
sketch of the recreated decorative scheme for the virtual
House of Pansa's walls. (Below) Rough sketch of the
floorplan for the virtual House of Pansa.
|
Basic House Model
The AutoCAD floor plan created by John Dobbins for the Pompeii
Forum Project was loaded in Animation: Master as a “rotoscope”
image, and the basic shapes of the atrium and its adjoining rooms
(vestibulum, alae, and tablinum) were
modeled in 3D. This basic framework of the house included
only blank walls, without columns, cornices, or decorations. The impluvium
was also modeled at this stage, since it had to be considered
when creating the floor textures and geometry. As the project
developed, this basic model would be modified many times over to
accomodate new additions.
Texture Maps
The next stage was the creation of textures for the flat
surfaces of the house. These included wall decorations,
doors, floor textures, and mosaics, and were based on the rough
sketches already compiled in the research and design phase of the
project.
The walls were decorated based on a basic design recorded by
August Mau in his book, Pompeii: Its Life and Art, and on
archival photographs that recorded the colors used in the stucco
decorations. After the basic color layouts were designed,
“bump maps” were created, to be used by the computer to
simulate depressions on the walls. Bump maps were used
because they are most efficient for describing subtle nooks and
crannies in already complex computer models.
Doors were recreated in Photoshop based on designs
from the House of Sallust, and were integrated into the existing
image maps for the side walls of the atrium.
Floor textures were created based on photographic data
compiled on the Pompeii Forum Project website. These
photographs were loaded in Photoshop, where they were
retouched and digitally enhanced for use as tile-able image and
bump maps for the virtual model of the House of Pansa.
Mosaic surfaces for the vestibulum and tablinum
were also based on photographic evidence. The vestibulum
mosaic, decorated with a dog and the warning, “CAVE CANEM,”
was based on a photograph of an actual vestibulum mosaic
in the House of the Tragic Poet, a contemporary wealthy Pompeian
residence. This image was retouched and resized to fit the
dimensions of the vestibulum of the House of Pansa. The tablinum
mosaic was based on the remains of the House of Pansa’s
actual tablinum, and a bump map was created for it, to
give the illusion of a tiled surface.
Once these image maps were created, they were all carefully
applied to the 3D model wall-by-wall, and aligned to fit
precisely with each other and with the house.


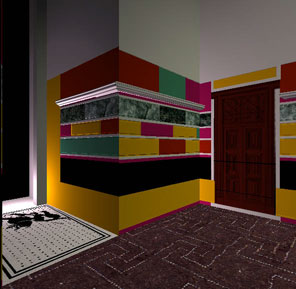
Sequence of three
screen shots, showing the process of creating and
applying image maps to the virtual House of Pansa. At
each stage, the image mapping became more complete and
more refined.
|
Ornament
The next step was to create 3D decorations to adorn the
virtual house, and to add realism and depth to the recreation.
First, decorations were created for the side walls, which
originally had small cornices integrated with the stucco work.
These could have served as shelves or simply as decorations to
add flair to the walls. These were modeled in 3D, then
integrated with the rest of the walls, and carefully aligned with
the existing virtual stucco work. Each wall had at least
two sections of cornice, and some had as many as four.
Once these were completed, columns were modeled and placed at
the front entrance of the atrium, the tablinum, and
at each ala. The capitals for the columns were
constructed based on drawings and photographs recorded in The
First Style in Pompeii: Painting and Architecture by Anne
Laidlaw. Tests were made using bump and displacement maps
for the capitals' ornament, but these proved unsuccessful, so the
decorations were modeled by hand in 3D instead, with beautiful
and realistic results.
Lastly, large cornices were created to sit atop the columns.
These were modeled in 3D, fitted, and integrated into the
reconstructed house, which was growing increasingly complex as
the project progressed.
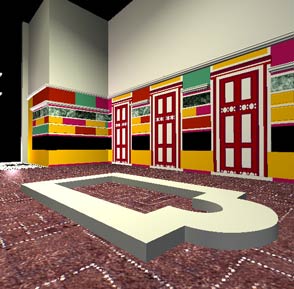
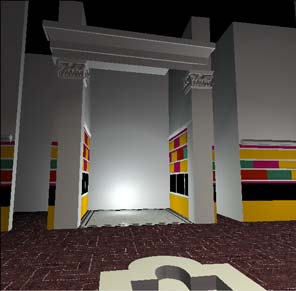
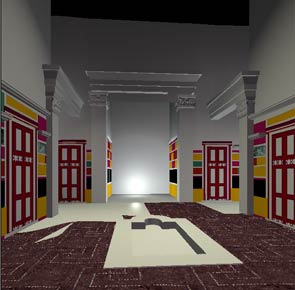
This sequence of
images documents the creation and application of the 3D
ornamentation for the virtual House of Pansa. Note how
the geometry of the house was modified to properly
accomodate ornamentation and the application of
additional image maps. The bottommost screen shot reveals
how the creation of the virtual House of Pansa, like the
contruction of a real home, was an ongoing process, and
how existing structures had to be temporarily moved or
modified while others were constructed.
|
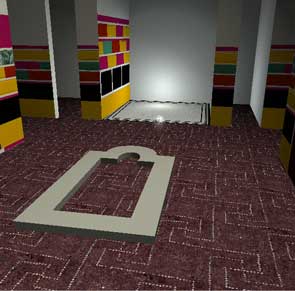
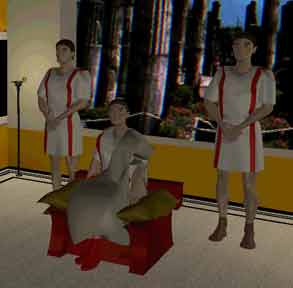
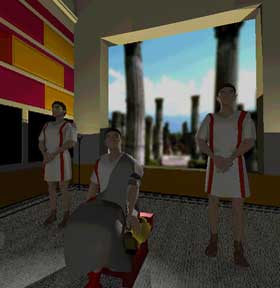
Furniture
The next step was to create furniture to adorn the recreated
House of Pansa. This included tables, a cistern, impluvium,
lamps, and a chair. All furniture was created based on
actual Pompeian furniture, documented in Pompeii: Its Life and
Art by August Mau, and Le Arte Decorative in Pompei by
Vittorio Spinazzola. This furniture was modeled in 3D, and
then integrated into the House of Pansa model. At this point, the
roof was also added and fitted to the compluvium.
This screen shot
shows the cistern, table, roof, and compluvium
in place. The cistern was later moved to a more proper
place, alongside the impluvium. The apparent
structural distortion is due to the use of an unnaturally
wide camera angle, used to get a wide view of the room.
|
Character Modeling
The next major phase of the project involved the creation of 3D
animated characters to occupy the virtual reality House of Pansa.
All characters would be variations of a basic Roman prototype,
which then would be modified to represent characters from
different walks of life.
The first step in their creation was to model a basic human
face, based on actual Roman portraits. This was modeled in
great detail, and then colored and textured using image maps from
Photoshop. Eyebrows, eyelashes, lips, and hair
were added, as well as skin tone and hair color.
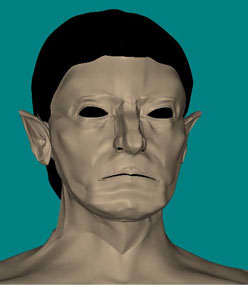
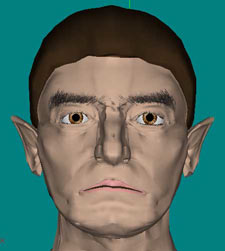
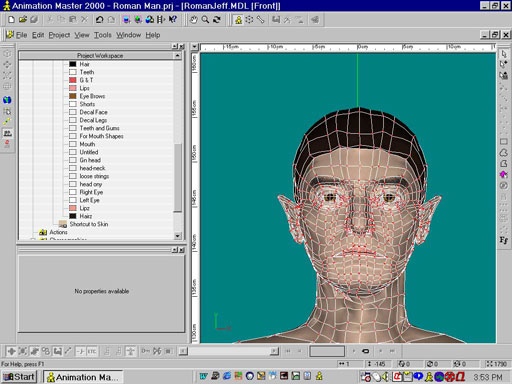
These screen
shots show the completely modeled face before and after
the application of fine details such as eyes, eyebrows,
and lip color (above). The bottom picture shows the
complex geometry underlying the face and the controls
used in the face's creation and manipulation.
|
Next, a body was created for the head. This body was then
“boned” using the Animation: Master biped
skeleton, which would be used later in the project to pose and
animate the completed characters. In the process of boning, the
body is organized into various components, each of which responds
to the movement of bones placed within it, much like the armature
of a robotic puppet, or even like the bones and flesh a living
vertebrate.


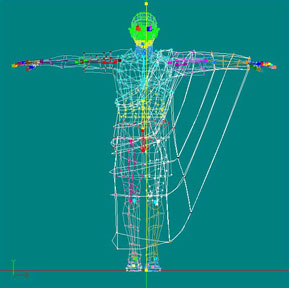
The top two
images show the front and back of the preliminary body
created for the characters in the virtual House of Pansa.
The characters were later modifed and enhanced by
integrating a basic human body model supplied with the Animation:
Master software; this was more efficient than
creating physical nuances, most of which would remain
hidden by clothing, from scratch.The bottom image shows a
later screen shot of the bone structure within the Roman
character; each color is a section of the model attached
to one of the diamond-shaped bones positioned within it.
These bones control the movements of the "flesh"
attached to them.
|
This basic human model was then fitted with clothes.
First, a tunic and toga were modeled. Next, they were
fitted to the character, and animated using the “Cloth
Wizard” feature of Animation: Master, which simulates
the motion and reactions of cloth interacting with a moving human
body. Unfortunately, after a series of attempts to make
this feature work correctly, it was decided that it was too
burdensome on the limited processing capabilities of a home
computer, and that it would be more practical to clothe the
characters using simple 3D models, hand animated with the body,
instead of simulated by the computer.


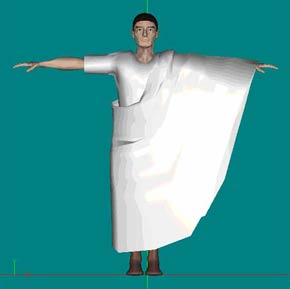

These screen
shots show the creaton of clothes for the virtual House
of Pansa's occupants. A basic tunic and toga, whose color
and decoration remained flexible, were created and fitted
on the character model. The bottommost shot documents an
abortive attempt at using Animation: Master's
built-in "Cloth Wizard" feature; even at low
resolution, the simulated cloth system took prohibitively
long to calculate, and failed to fit the character's body
properly.
|
Once this basic prototype figure was created and clothed, it
was posed to see whether its virtual skeleton and clothes worked
properly. Several poses and animations were tested and
created, and character creation moved to the next stage, which
involved creating the different types of Romans to populate the
house.
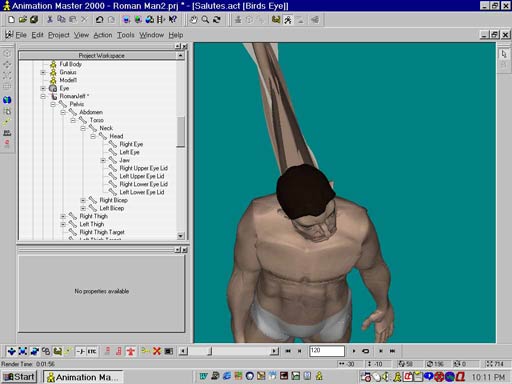

These three
images demonstrate some of the difficulties encountered
while posing and animating the character. Computer
animation is a grueling and meticulous task, and even the
simplest movements can require great amounts of planning,
manipulting, and refining before they begin to approach
visual plausibility. Particularly challenging was posing
the toga without intercepting the geometry from the tunic
or body underneath it; this problem required refining the
bone structure (which also affected garments) several
times in order to obtain the desired result. The bottom
test pose is based on an ancient Roman statue of a
gesturing orator.
|
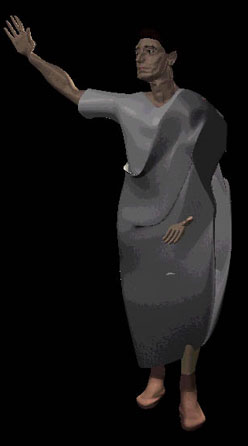
Four types of Romans were created: the paterfamilias,
his slaves, working class clients, and aristocratic clients.
The paterfamilias was clothed in a tunic decorated with
red stripes, a toga, and red shoes. His hair was changed to
grayish to reflect his age. The slaves were clothed in
tunics decorated with red stripes (to match those of their master),
and brown shoes, with dark brown hair. Working class
clients were dressed in an off-white tunic without stripes (only
the richest Romans wore the bleached white toga) and plain brown
shoes. Aristocratic clients were dressed in a plain white toga
and tunic, with brown shoes.
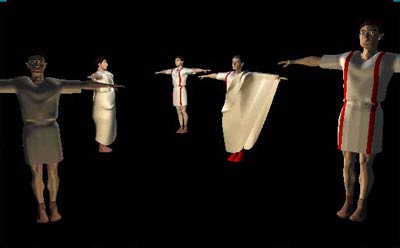
This screen shot
shows a grouping of the four types of characters created
for use in this project: (from left to right) working
class client, aristocratic client, slave, paterfamilias,
and another slave.
|
Lighting Design
Once the basic modeling of the virtual house was complete,
lighting was designed to evoke the mood of the early morning
hours in ancient Pompeii.
First, blank hemispheres were modeled to represent the world
outside, visible at the front entrance, compluvium, and tablinum.
Blank sky was used for the front entrance and compluvium,
but for the view outside the tablinum, a photograph of the
ruins of the actual peristyle at the House of Pansa was used, as
a dramatic, anachronistic reminder of the fate of Pompeii and its
residents. A series of tests was conducted to see which
colors and light settings best complemented the architecture and
created the illusion of the proper time of day. Finally,
shades of bright blue were used to reflect the intense
Mediterranean sun shining in the early morning.
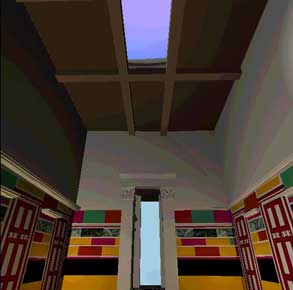
This screen shot
shows a preliminary lighting test for the simulated early
morning sunshine created to illuminate the salutatio
ritual. The purplish hues were later abandoned in favor
of plainer but more realistic blues.
|
Next, lights were created and placed to light the interior of
the house. These lights were intended to portray natural
light, so they were created with a muted hue of grayish yellow.
These were placed by window openings to mimic the glare of early
morning sunshine. An intense “volumetric”
spotlight was placed atop the compluvium’s opening in
the ceiling, to dramatically light a corner of the house.
Lamp lights were placed to portray the emissions of the oil
lamps placed around the atrium. Unlike the natural lights,
these were made much dimmer, and were of a darker amber hue, to
create the illusion of soft candlelight.
These two screen
shots both show the same scene in the tablinum
with different light settings. The bottom picture was
rendered with shadows turned on (which dramatically
changes the effect of the scene, but, unfortunately, also
dramatically increases the time it takes for the computer
to render each scene - which is why most shots of the
virtual House of Pansa were rendered without shadows
turned on).
|
Virtual Reality
The next stage of production involved the
creation of a QuickTime Virtual Reality environment of the House
of Pansa, which would place viewers within the recreated house in
the middle of the salutatio ritual. In order to create
the QTVR immersive virtual reality environment, a sequence of 15
shots at 24 degree intervals were rendered from within the House
of Pansa in Animation: Master from a point beside the impluvium.
These shots were then cropped in Photoshop, and loaded
into Ulead COOL 360
software, where they were assembled into a single panoramic shot
and exported as a QTVR file, which was now viewable on the web as
a 3D virtual reality environment. A flat JPEG panorama of the
house was also exported for viewers without the QuickTime plugin,
with slow connections, or who simply wanted to see a single
panoramic shot of the House of Pansa's interior.
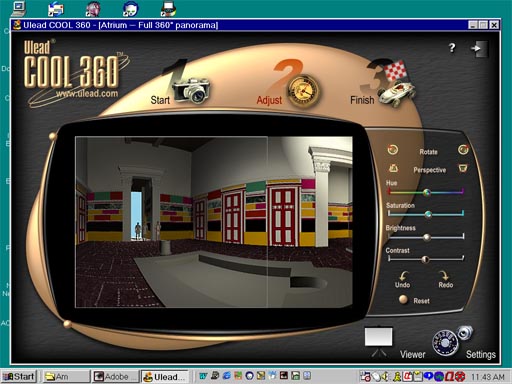
This screen shot
shows the Ulead Cool 360 software, which was
used to assemble pictures of the virtual House of Pansa
into a QTVR environment and a JPEG panorama.
|
Animation
The next stage of production involved animating the 3D
characters as they'd appear for the salutatio ritual.
First, the poses and movements of the characters was decided upon.
Next, these poses were created as "Actions" in the Animation:
Master software. These actions were then loaded into the
characters, which were placed in the house as part of a larger
choreography.
Problems appeared in the software at this stage of production.
The animations would not render correctly: the computer would
only show lights, without any architecture or people. After many
days trying to solve this problem in a number of ways, using
technical support, the Hash Animation: Master mailing
list, and an SGI workstation at the University's Digital Media
Lab, the animations were temporarily postponed so that the rest
of the project could be successfully completed, since so much
time had been wasted trying to overcome the software glitch.
These two screen
shots show some of the frustrating problems that appeared
when it was time to render the character animations.
Neither shows a properly rendered scene, but both should.
|
After days of troubleshooting and experimentation, a way to
successfully animate the 3D Roman characters was finally found. A
scene of the paterfamilias, attended by two slaves,
looking up to see an approaching client, was created in Animation:
Master, and rendered as a QuickTime movie. The original
movie was over 2 megabytes, which was too large for the Web, so
the movie was re-rendered using Sorenson compression, bringing
the file size down to just over 200 kilobytes.

This screen shot
shows a successful rendering of a QuickTime movie for Salutatio
at the House of Pansa.
|
Web Presentation
The final stage of the project involved designing
and creating a web page to present the final product. The website
was designed in FrontPage Express, using sleek, fast-loading,
and elegant HTML, so that the site would be easily accessible to
as many viewers as possible. The design of the site was based on
the same "First Style" decorative scheme that adorned
the walls of the virtual House of Pansa. After weeks of hard
work, Salutatio at the House of Pansa was complete and
accessible to millions of viewers on the World Wide Web.
Click here to continue to
the Tour of the House.
Click here to return to
the Index page.